

How To Remove A Rev A Shelf Drawer
I'm sharing my comprehensive guide with y'all here on how to build drawers for cabinets and furniture in this mail service!
.
I know I'grand in the minority here, but I dearest to build drawers. It never gets one-time and I dear adding them to the furniture I build whenever I can. But, I know for many, drawer making seems intimidating and frustrating.

I'm detailing EVERYTHING—from how to calculate your drawer size, to what holes on the slides to put your screws in. EVERYTHING. I'm showing yous EXACTLY how I exercise it every single time. So if you're set to get-go making drawers, let'south get to it. Be warned, this is a long mail, merely it's FULL of info.
.
As a general note, I will be talking about brawl begetting, side mount drawer slides only in this mail service. That's the only kind I use in my projects. I've plant all others to be extremely frustrating. PS, if you like the desk and dresser I show in this postal service, exist certain to check those posts out hither: DIY Desk and DIY Dresser.

As well, I make all my drawers using ¾" plywood for the box and ¼" plywood for the lesser. A whole lot of making, installing and building drawers is making sure things are lined upwardly and square. I like to apply plywood to build my drawers because then I don't have to worry nigh twisted or warped boards causing me issues with alignment.

Also, it looks SUPER CLEAN and because plywood doesn't move most equally much as solid wood with seasonal changes, it's less likely to cause any stress pulling or pushing on slides, etc.
.
The following is the exact procedure I use to brand, mensurate, and install drawer boxes. It'southward not necessarily right or incorrect…it's just what works for me. If you'd like a printable version, you can grab i hither:
Jump to:
- Pace 1: Determine Drawer Front end Heights
- Footstep ii: Mount Drawer Slides
- Step three: Build Drawer Boxes
- Step 4: Install the Drawer Box Into Slides
- Footstep 5: Adhere Drawer Fronts
Step 1: Determine Drawer Front Heights
Types of Drawer Fronts
Before we tin effigy out drawer front sizes, we need to cover the different scenarios for drawer fronts. Starting time, y'all need to determine whether your drawer fronts will be inset or overlay. (See this post for data on inset vs. overlay) So, you need to determine whether yous take framed or a frameless drawers.
.
Here are a few examples:
The top drawer of this desk is inset with a frame (notice it is surrounded on all sides by a frame). Detect the drawers are inset considering they set inside the front of the cabinet. The bottom drawers are inset without a frame (observe that the cabinet DOES have a face frame, just the individual drawers are not individually framed).

Then nosotros have total overlay drawers that are not framed in this example. Notice the drawers hang OVER the sides of the chiffonier and are not individually framed.

How to Decide Drawer Front Size?
Office of this involves math, only function of information technology involves personal preference. I'll bear witness yous two examples to help give you an idea how to summate sizes.
.
Measurements for Inset Framed Drawers
Inset framed drawers are by far the easiest to figure. Only measure the opening of the frame and subtract ¼" from both height and width to observe your drawer front size. Basically, the rule of thumb is allowing ⅛" space around all sides between the drawer forepart and the frame.
Measurements for Frameless Drawers
However, if the drawers are not individually framed you accept options. And options complicate things.
.
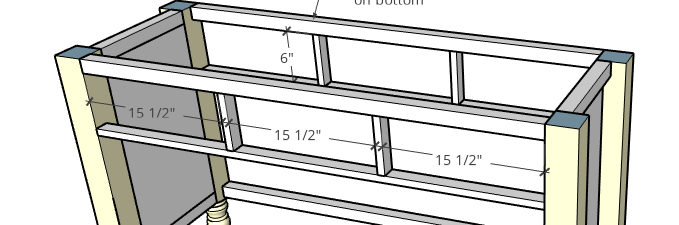
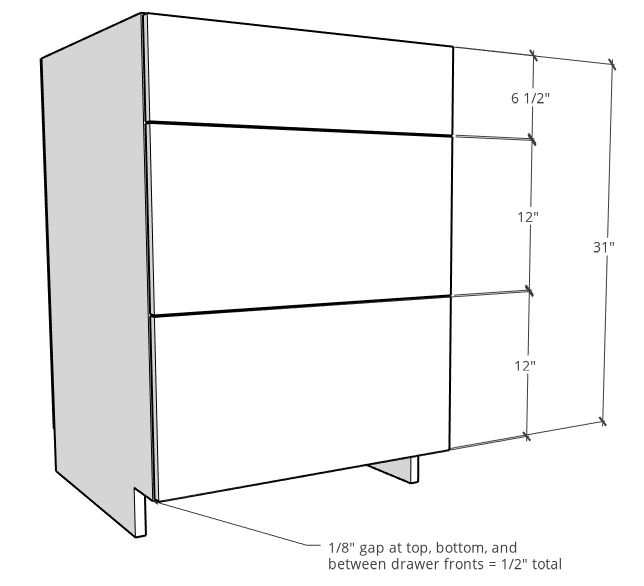
Let's await at this kitchen cabinet as an example. I desire three drawers, so I demand three drawer fronts. I desire the ii bottom ones equal size and the top i smaller. I also desire these drawer fronts full overlay (see this post for details on overlay/inset options).
.
Since these are full overlay, my drawer fronts will cover the entire front of the cabinet EXCEPT ⅛" on all sides (come across this post for details). There should too be ⅛" gap Between the drawer fronts also.
.
So my cabinet height is 31", and I subtract the ⅛" top gap, ⅛" bottom gap, and two ⅛" gaps between drawer fronts and I accept thirty ½" full in drawer forepart coverage. If I want two fronts to exist 12" alpine, and so xxx ½" – 12" – 12" = 6 ½" left for the top drawer front.
If you are doing inset drawer fronts, the thought is exactly the same except all your drawers would accept to fit Inside the opening and not cover the sides…like on the bottom of this dresser shown here.

If I wanted those drawers to all be equal, I would take xxx ½" and divide by iii to go all the fronts need to be ten ⅙"—so I'd probably circular downwards to ten ⅛" since that'southward the closest number on my tape measure haha.
Footstep 2: Mount Drawer Slides
At present that I have my drawer forepart sizes figured out, I tin can figure out where to mount my slides. I use brawl bearing slides for all my furniture and cabinets. They are piece of cake to employ and easy to adjust. Then that'south what I'll exist showing in this post. FYI yous can purchase these from Home Depot, or online from Amazon, Rockler, tons of other retailers.
.
Ball bearing slides come in many sizes—normally in 2" increments, then, 10", 12", xiv" and so on usually up to well-nigh 24" long. You can buy these with or without soft shut mechanisms. You can cull whatsoever size slide you desire as long as it's the same length or shorter than the depth of whatever you lot are installing it into.
.
If your drawer front will be inset into your cabinet, yous also accept to take into consideration that that will button your slide back the thickness of your drawer front. And then in that case, if I have a chiffonier 22" deep and I have a ¾" thick inset drawer front, I tin can't utilise a 22" slide anymore. I take to get with a xx" or shorter slide.
How and Where Do I Install the Drawer Slides?
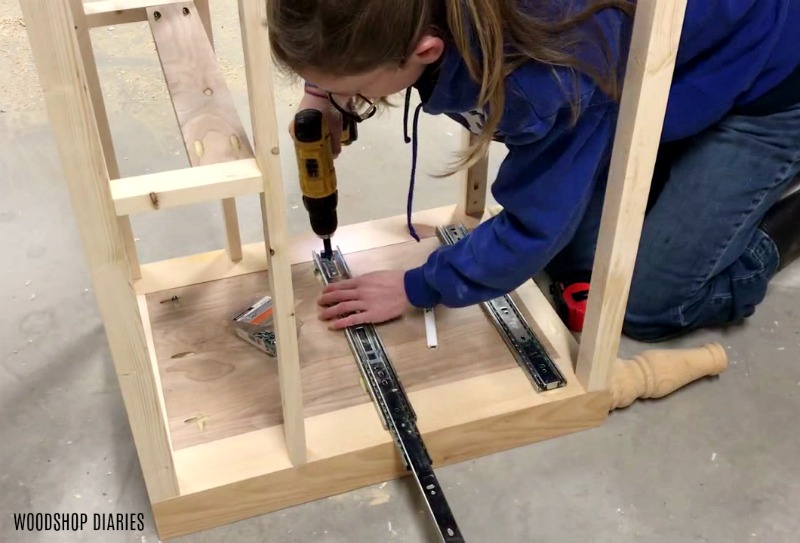
I get a lot of questions about jigs to mount the slides. I don't use any. When at all possible, I turn my cabinets or article of furniture on its side to install my slides instead of doing it while the piece is continuing. It'southward much easier to measure and install that way without anything moving while driving the screws.

I lay the chiffonier over, mensurate, marker, then utilize a square to draw a line at that mark square to the front of the cabinet. And then, I line the slide up with the mark and screw in identify.
.
I e'er start at the bottom and work my manner upwardly. I mountain the first slide all the way at the lesser of the cabinet. OR if it's got a frame, I mount the slide so that the bottom is flush with the lesser opening of the frame.
.
Since I already know my drawer front tiptop, I tin can figure out where to mount the slides pretty easy. Let'southward expect again at this cabinet example. I've greyed out the drawer fronts to give yous a visual hither.
.
My lesser drawer front is 12". To brand things piece of cake and requite me enough of wiggle room, I measure up from the bottom of the chiffonier virtually 1" higher than that drawer front end—so 13". That'due south where I mount the next slide.
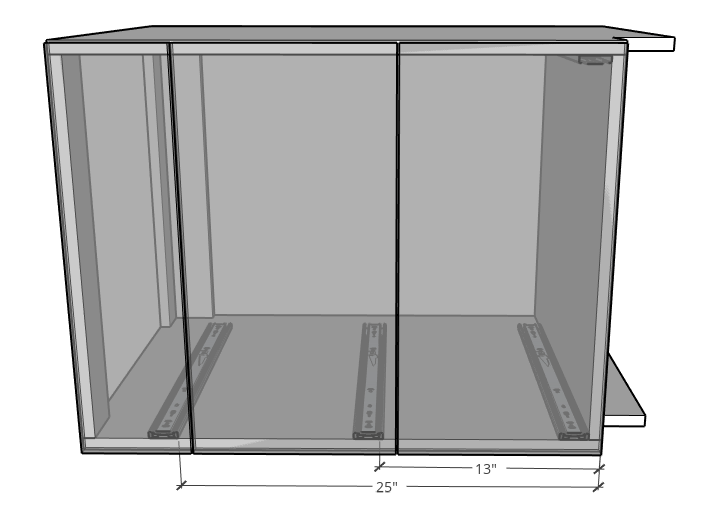
Then I do the aforementioned for the side by side slide above it, just add together the two fronts below it plus an extra inch—so 12" + 12" +1" = 25". Every bit long as you clear the drawer front below it, it's non critical where you identify your slide every bit long as it's the aforementioned on both sides of the cabinet.
.
If this was for inset drawers, the same applies, just measure from the INSIDE of the opening vs the OUTSIDE of the chiffonier.
Inset vs. Overlay Mounting
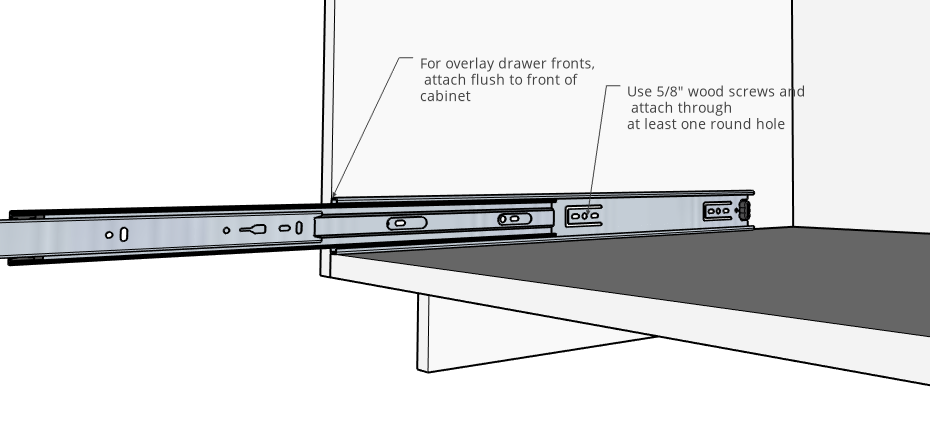
If you are using overlay drawer fronts, install your slides flush with the front end of your cabinet.
But, if you are using inset drawer fronts, install them the thickness of your forepart INSET from the front of your cabinet. Typically, your forepart volition be ¾" thick, and then install it ¾" from the front edge of the cabinet.
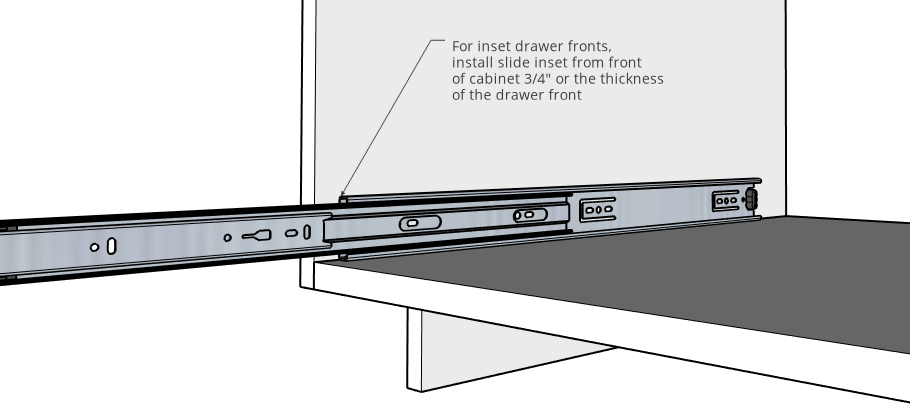
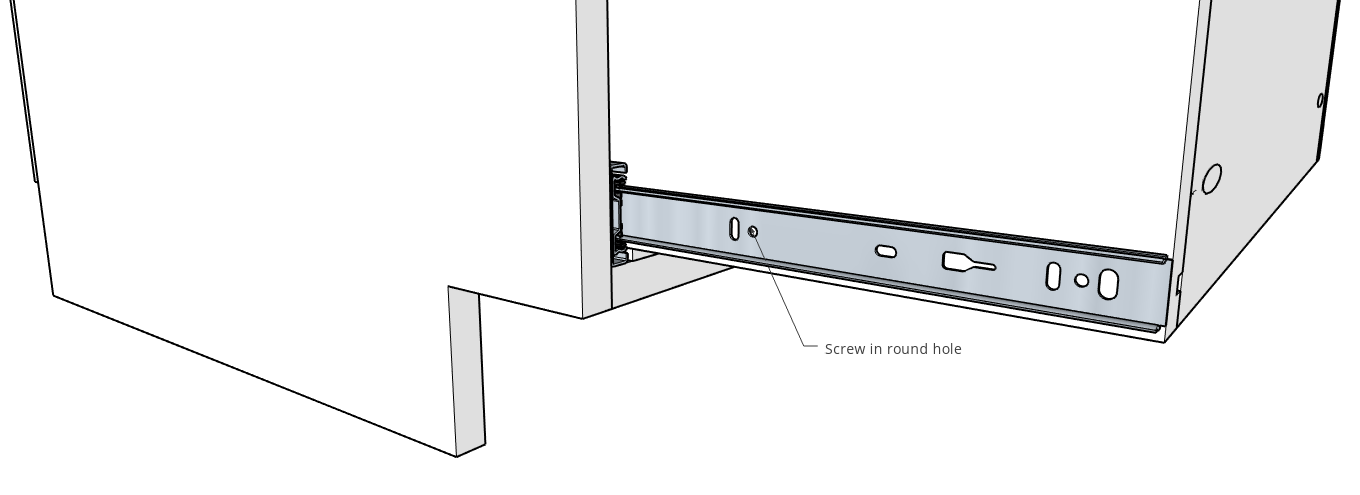
Typically, these ball bearing drawer slides have horizontally slotted holes on the piece that mounts to the cabinet and vertically slotted holes that mount to the drawer box.
.
This offers you the ability to adjust the drawer box in both directions every bit needed. I've never used the horizontal slots to suit, then when I install these into the chiffonier, I utilize the circular holes to keep it held in place.
Simply extend the slide, and use ⅝" wood screws to attach the slides into the chiffonier in at to the lowest degree 3 places.
Do I need spacer blocks?
Everything prior to this causeless frameless cabinets or that the within of the cabinet was affluent.
.
But, if a cabinet or piece of piece of furniture has a face frame that covers a portion of the inside of the cabinet similar shown below on this storage desk, you'll demand to install a spacer cake then that you can mount the drawer slide flush with the opening in the frame so it can slide in and out.
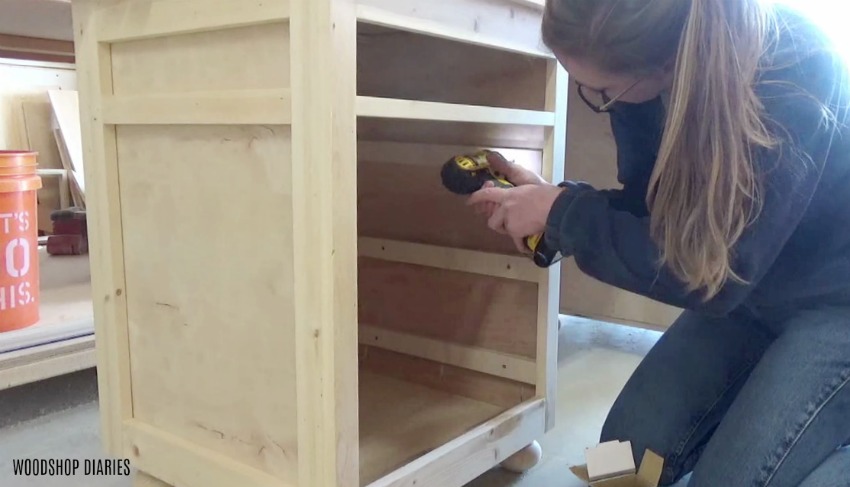
Y'all'll mount the spacer blocks at the measurements discussed above, so mount the slides on top of them similar shown.
Step three: Build Drawer Boxes
Then at present that the slides are in place, now it'southward time to actually build drawers.
Drawer Box Elevation
Again, merely similar with the drawer front sizes, there are 2 main options that you may meet. You lot either have a frame around the drawer or y'all don't. In this case with this desk-bound, notice that the bottom cabinet drawers don't accept frames but the top ones exercise.

For Framed Drawers: If my drawers have frames, I make certain that the height of my drawer box is at least 1"shorter than the pinnacle of my opening to make sure information technology's got enough of room to open and close.
.
For Unframed Drawers: If my drawers don't have frames, I make them near 2-three" shorter than my drawer front. This isn't a "rule," it's merely what I've found to work well for me.
Drawer Box Length & Widths
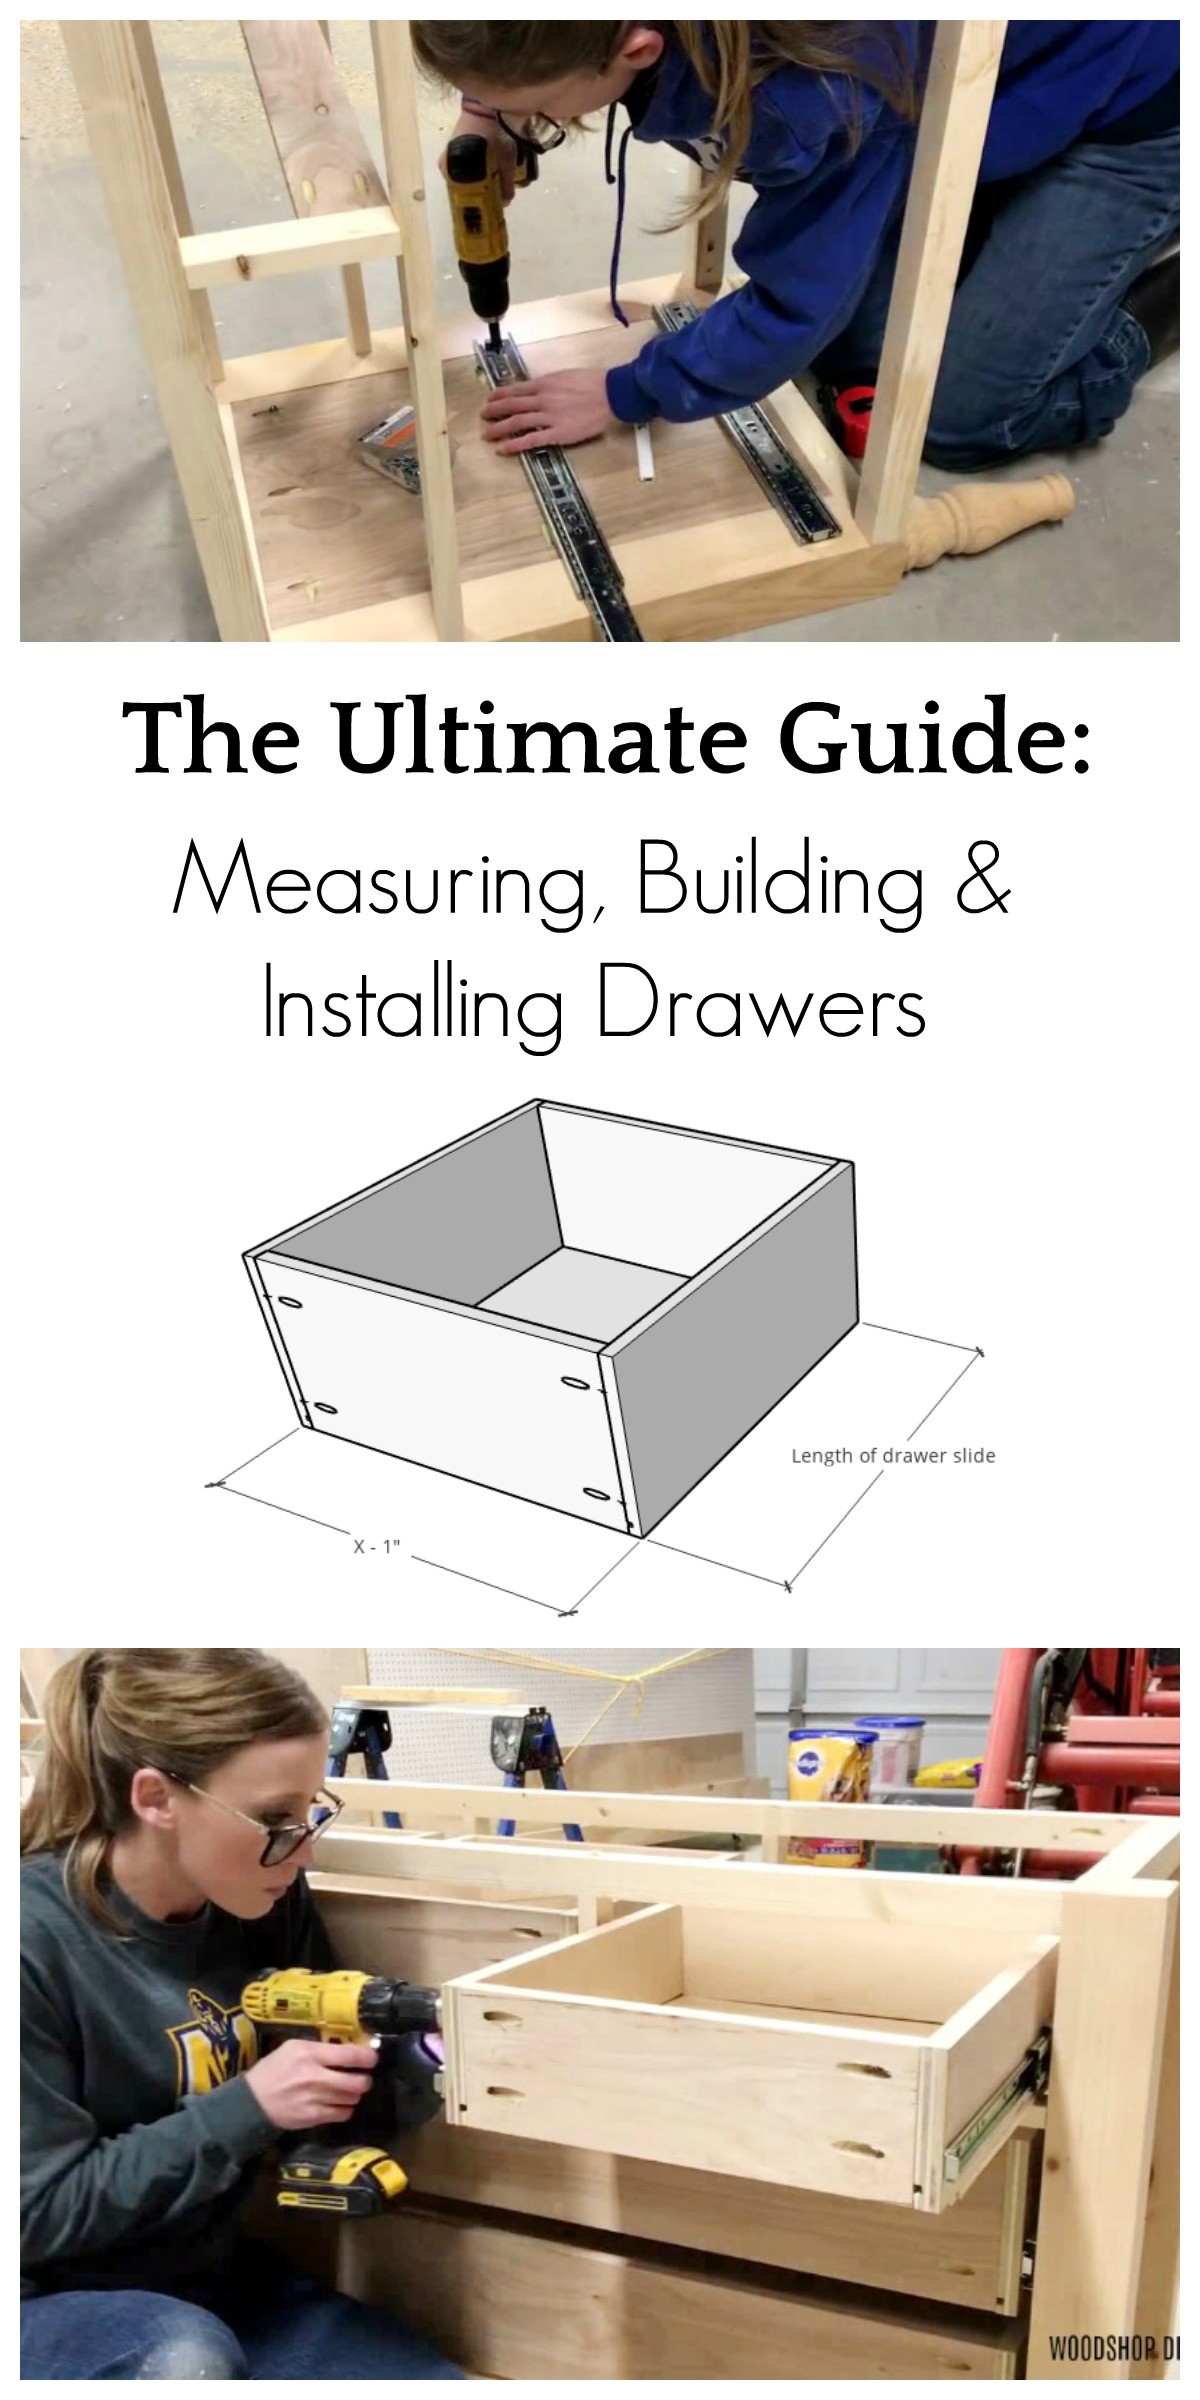
In social club to figure the lengths to cut all the pieces to make a drawer, yous only need two measurements.
.
You lot need the length of your slides (ex. If y'all're using 16" slides, the length is 16"…pretty straightforward), and the width of the opening in which you plan to put your drawer. That gives y'all the LENGTHS to cut your pieces.
.
Frameless Cabinets
So, let's take this case again. This is a frameless kitchen cabinet that I'm putting iii drawers into. I'm using 22" drawer slides, and the width of the opening is X (remember X from algebra course??).
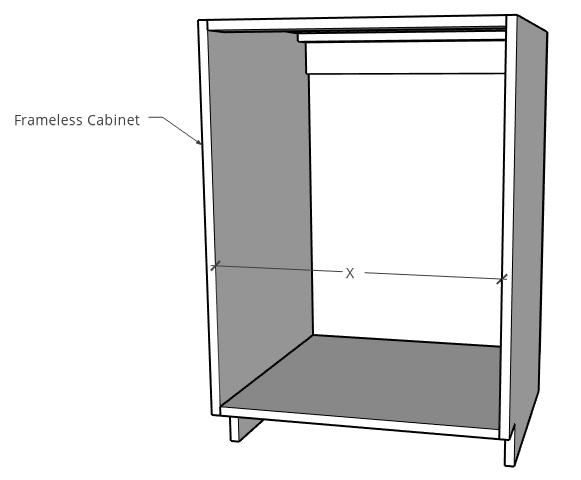
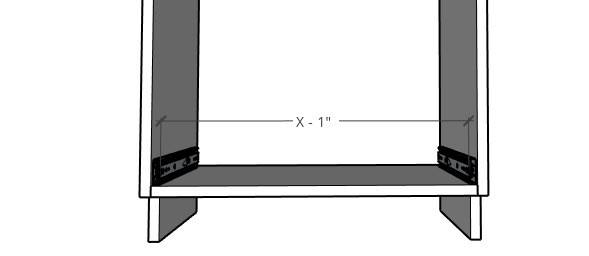
My overall drawer box width should be one" LESS than my opening—this allows room for the drawer slides.
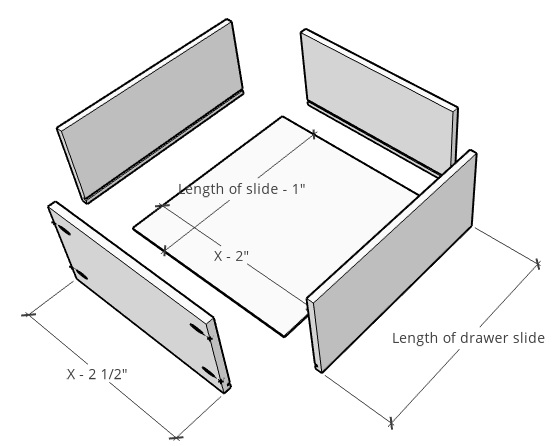
Now, the drawer pieces should be cut as follows. The sides are ¾" plywood and the bottom is ¼" plywood. The ¼" plywood goes into dadoes cut into the drawers similar shown once information technology'south assembled with pocket holes. I'll show that in detail later on.
Face up Frame Cabinets
I mentioned adding spacer blocks before into cabinets or furniture with face up frames. This same thing applies in the case when you have spacer blocks for your slides, you only need to make certain yous measure betwixt the spacer blocks instead of the inside of the cabinet.
How to Build Drawers
I get together my drawers using ¼" plywood in dadoes on the drawer box sides. If yous don't want to cut dadoes, you tin also, simply glue and staple ¼" plywood into the bottom of the drawer box, Still, you lot need to continue in mind that that will add ¼" to the drawer box tiptop, and so you may need to adjust accordingly.
.
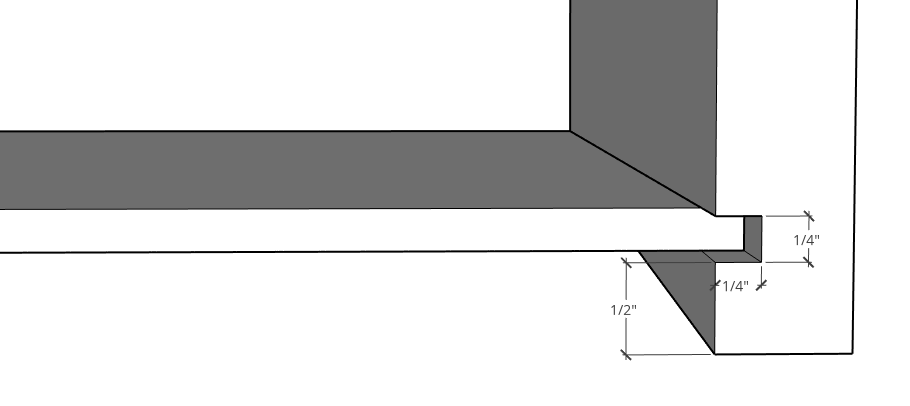
I found the dado method to exist clean looking and strong, so I prefer that. I adjust the top of my table saw bract ¼" and cut this dado ½" from the lesser side of the drawer box pieces.
.
You can make multiple passes with a regular saw blade on the table saw to go the ¼" thickness, or utilize a ¼" dado bract and make one laissez passer or use a router and ¼" directly bit.
I assemble the side pieces using ¾" pocket holes and i ¼" woods screws similar shown. Y'all can check out any of my YouTube video tutorials (like this desk or this dresser) where I build something with a drawer to see the process. Once I have three pieces together, I slide the ¼" plywood piece in place and attach the last piece.
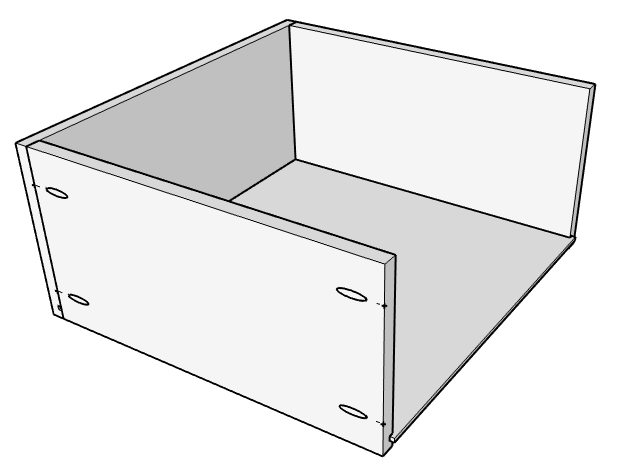
You lot tin use a corner clamp or square to hold pieces foursquare when assembling them. Just, the all-time way to help ensure the drawer is square is to make sure the ¼" plywood lesser is square before putting it in. It should be a pretty tight fit and should agree the pieces foursquare if it is square, too.

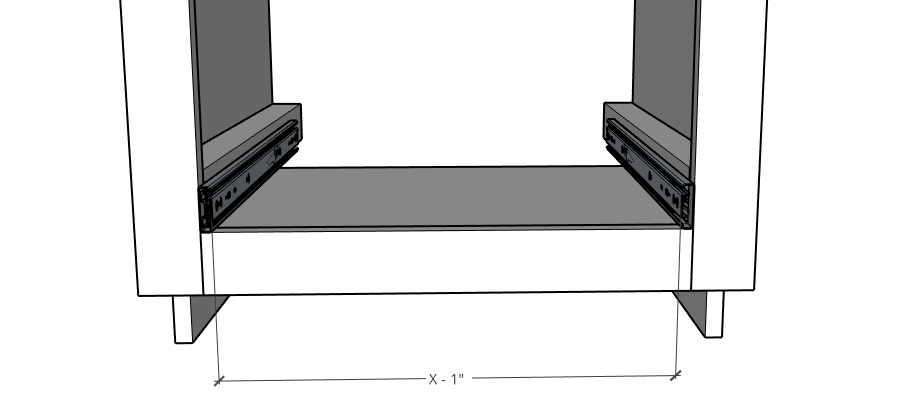
Footstep iv: Install the Drawer Box Into Slides
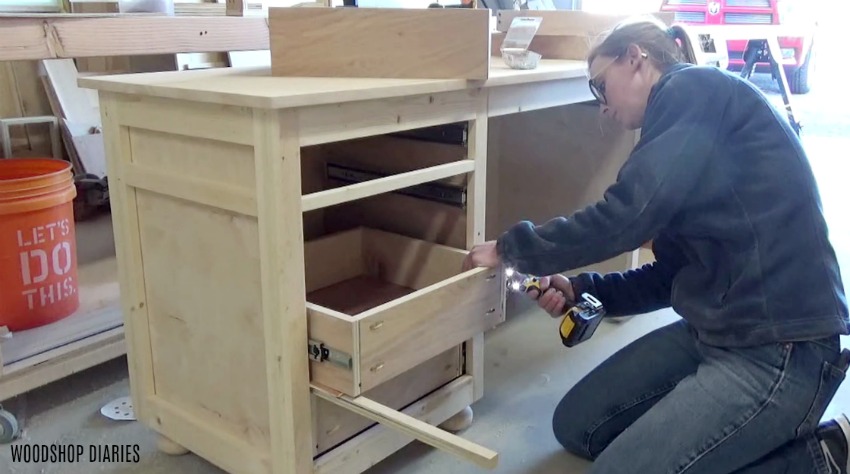
There are enough of ways to install the drawer boxes, but this is quick and works well. I always get-go at the bottom and install the bottom drawer first. I place ¼" plywood scraps underneath the drawer box and slightly extend the drawer box and the slides on both sides.
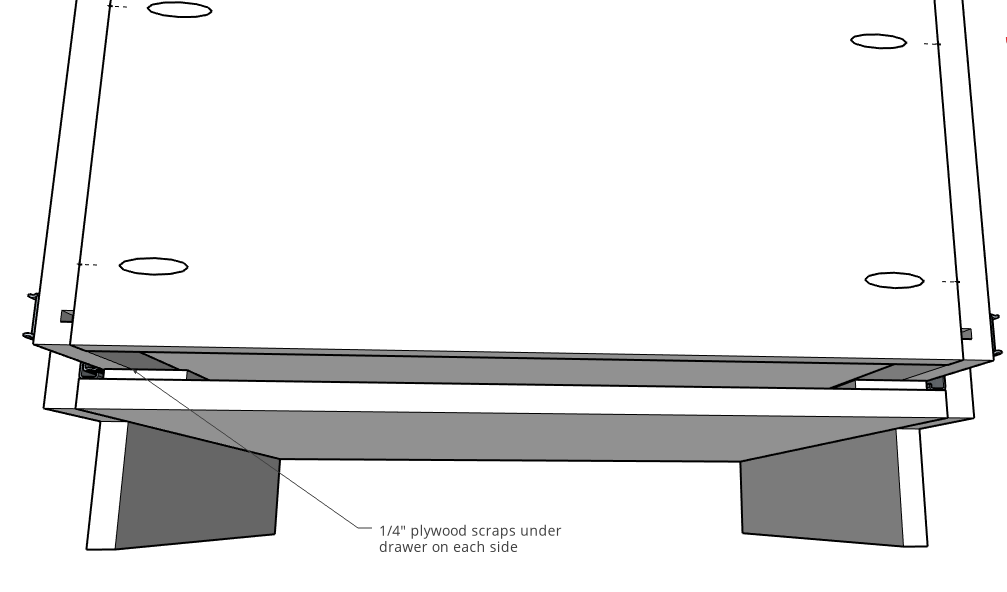
I extend the slide and drawer box then that the forepart edge of the slide is FLUSH along the forepart border of the drawer box and put 1 ⅝" forest spiral on each side in a vertical slotted hole.
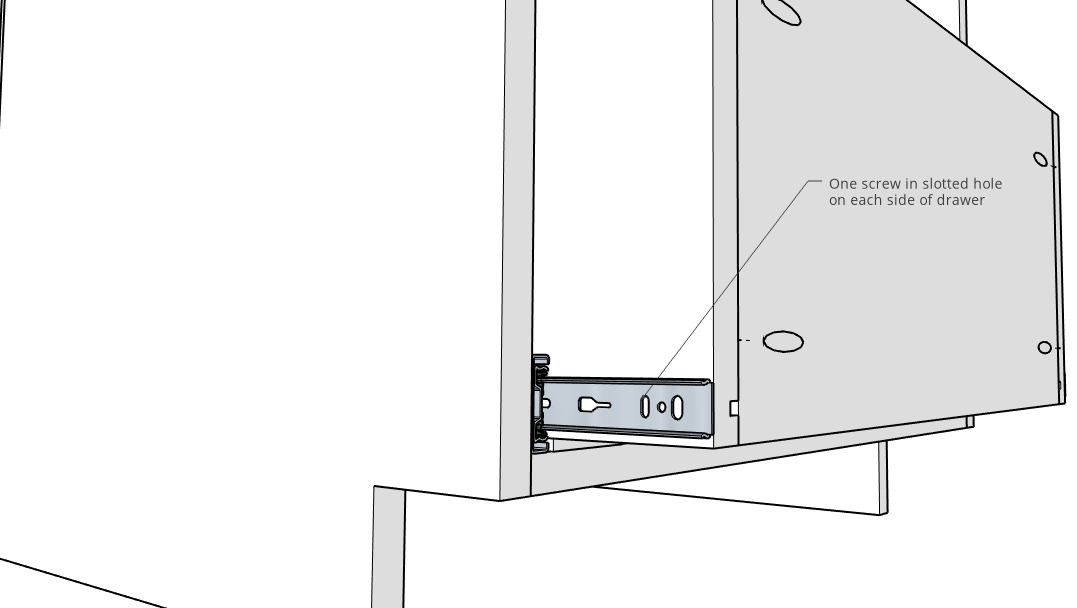
And so, keeping the drawer pushed downward on the ¼" plywood scraps, I extend the drawer and add another screw on each side into a circular hole.
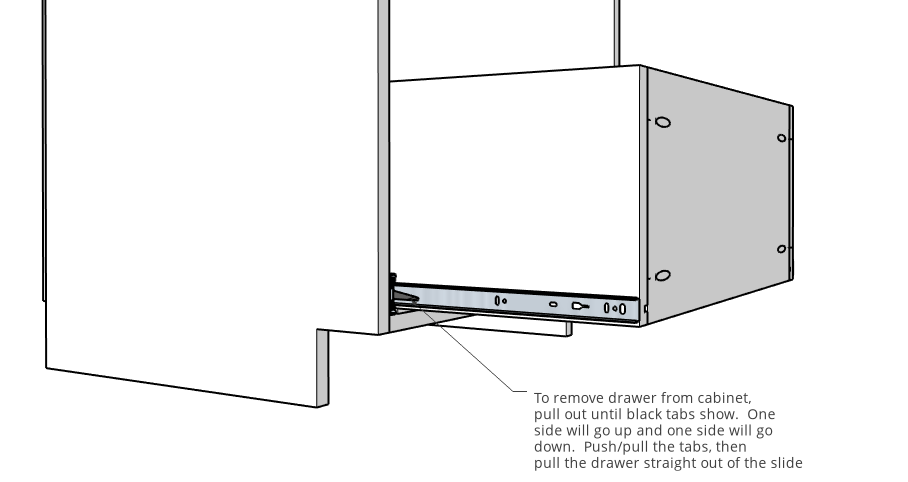
Then, I remove the drawer from the slide and add another screw onto the back of the slide. To remove the drawer, extend it fully and in that location will be two tabs on each slide. One volition push up and i volition push down. Simultaneously push these tabs and pull the drawer straight out.
And so add a spiral into the end either in a round or slotted hole.

Then, slide the drawer dorsum in place and accommodate as needed using the screws in the vertically slotted holes. Usually it won't demand any adjustments, but if it does, that's why the spiral holes are slotted—simply loosen the screw, adjust, and so tighten again.

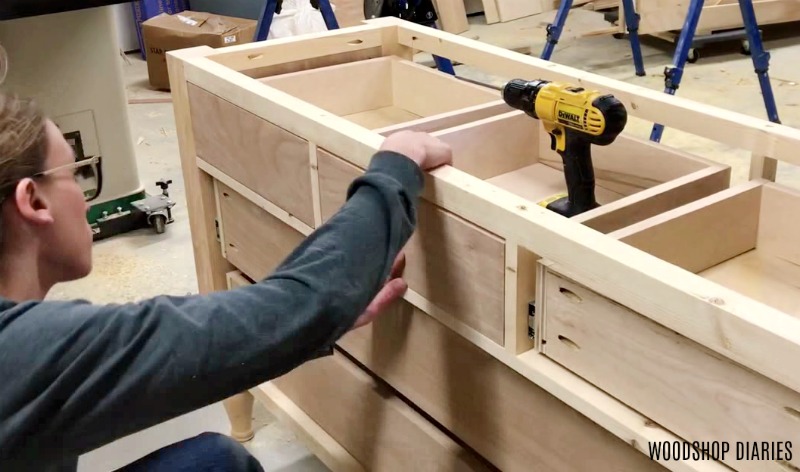
To add the next drawer, I use fleck forest blocks stacked on top of the box beneath and follow this same process. I stack the spacer blocks until the lesser of the drawer is higher than where the drawer front below information technology will be–basically the drawer box just has to clear the drawer front below it.
Step 5: Adhere Drawer Fronts
At that place are a lot of methods for centering and attaching drawer fronts. Simply, I don't use any of them (I know…I'one thousand weird).
.
I've constitute the easiest fashion to attach drawer fronts is to lay the piece on it's dorsum, and set the fronts in place letting gravity hold them where you want them and so yous can get them centered.
.
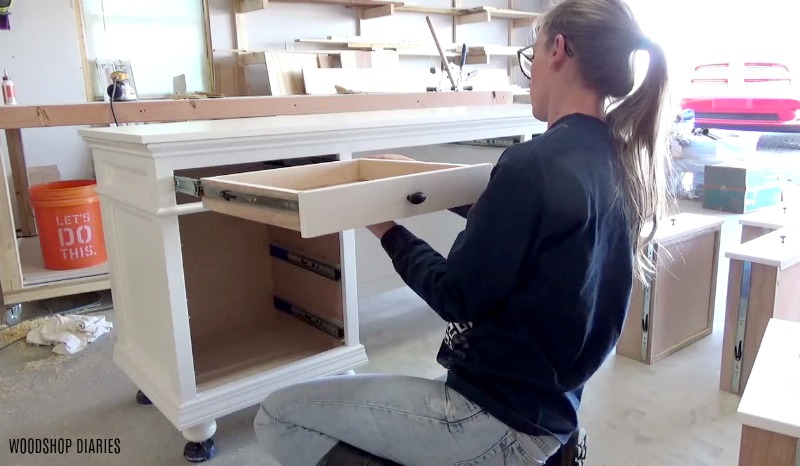
However, if that's non feasible, the next easiest way is to go out the meridian of the piece off so yous can access the within of the drawers like shown beneath.
I concur my drawer fronts on, and eyeball the gaps around the edges trying to become them every bit fifty-fifty as possible–information technology should be well-nigh ⅛″ on all sides.
.
If I'm painting the piece, I'll brad boom the drawers in identify, then use a couple of 1 ¼″ woods screws to securely attach the fronts from the inside of the drawer box. I can putty over the boom holes and no ane will know.
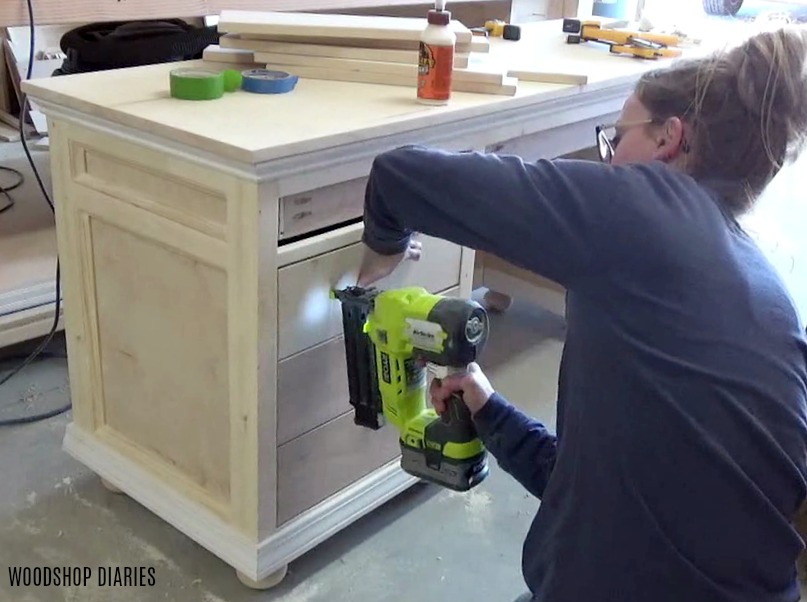
However, if I'one thousand non painting, I avoid the brad nails and notice a way to either hold the front end in place or clamp it in place while I screw it from the within. This is why it's best to leave the acme off when possible until later the drawers are finished.

And that's how to measure for, install, and build drawers. I've tried to cram everything I've learned from experience in four years into i giant blog mail service tutorial. Whew…that'southward a lot.
.
I'll exist 100% honest with you, though…this isn't a scientific discipline. Your measurements don't have to be exactly what I showed you lot. In some of my images, yous'll even discover that I used to identify my slides college than I practise at present. And that worked fine! This post is meant to be a guide, but non the rule book 🙂
.
The best manner to get comfortable with drawers is to try them!! Literally everything I've told you in this post, I learned on my own just by doing it. So I hope it'southward been helpful, just at present you've got to Use it and get comfy with information technology. You can practice this…I promise!
.
Then if you enjoyed this post and want to save it for later, be certain to pin it!
Until next fourth dimension, friends, happy edifice 🙂


Source: https://www.woodshopdiaries.com/theres-no-wrong-way-to-make-a-drawer/
Posted by: wardowereed79.blogspot.com
0 Response to "How To Remove A Rev A Shelf Drawer"
Post a Comment